← Go Back
How To Create A Pull Request On GitHub
This article walks you through the process of creating a pull request on GitHub using the command line and Git, a version control system.
August 10, 2020 | 7 min read

Introduction
Git is a free and open-source version control system for tracking changes in computer files and coordinating work on those files among multiple people. Open-source projects maintain their files in a Git repository, which is hosted on a cloud-based service like GitHub or Bitbucket.
Pull requests are a feature that makes it easier for developers to collaborate using GitHub.
This blog post will guide you through making a pull request to a Git repository through the command line so that you can contribute to open-source software projects.
Prerequisites
You should have Git installed on your computer. To check if Git is installed, open your terminal and run the following command.
$ git --versionYou’ll also need to have or create a GitHub account. You can do so through the GitHub website, and can either log in or create your account.
Finally, you should identify an open-source project to contribute to.
Create a Copy of the Repository
In order to contribute on an open-source GitHub project, you will first need to make your own copy of the repository. To do this, you should fork the repository and then clone it so that you have a local working copy.
You can use my demo repo to follow along.
Fork the Repository
You can fork a repository on GitHub by navigating with your browser to the GitHub URL of the open-source project you would like to contribute to.

Once there, click on the Fork button in the top-right corner. This creates a new copy of my demo repository under your GitHub user account with a URL like:
https://github.com/<USERNAME>/demoClone the Repository
Once the repository is in your account, clone it to your machine to work with it locally.
To clone, click the Clone or download button and copy the web URL.
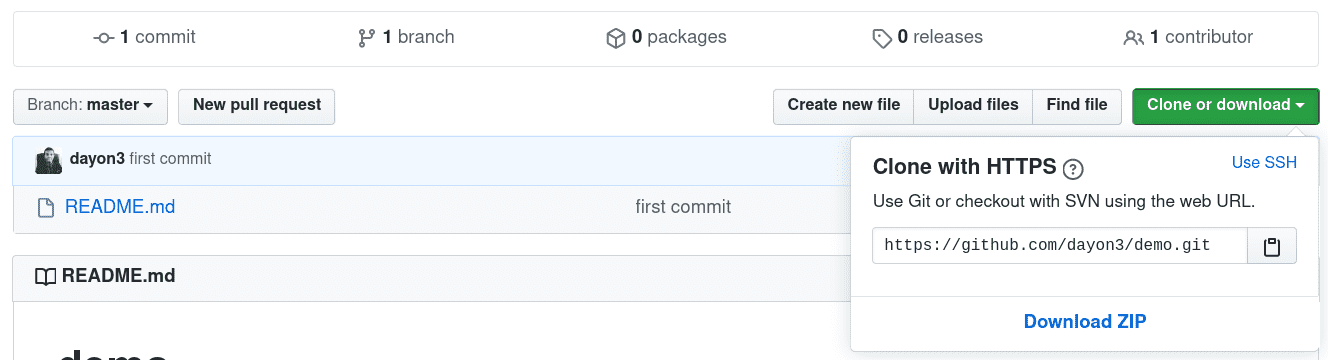
Next, clone the repository by opening the terminal window on your computer and running the following command:
$ git clone https://github.com/<USERNAME>/demo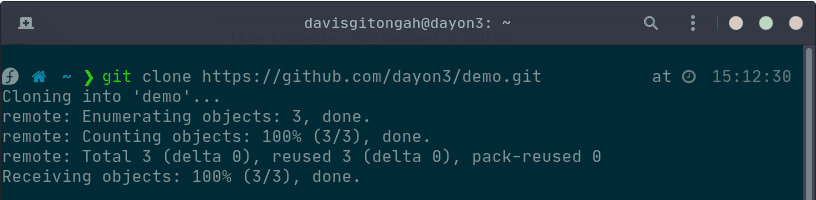
Now that we have a local copy of the code, we first need to navigate to that local folder by running this command:
$ cd repository
Now we can move on to creating a new branch.
Creating a New Branch
It is considered best practice to branch the repository so that you are able to manage the workflow, isolate your code, and control what features make it back to the master branch of the project repository.
Now, we’ll create and switch to a new branch, with the following command and -b flag:
$ git checkout -b [BRANCH NAME]
At this point, you can now modify existing files or add new files to the project on your own branch.
Make Changes Locally and Commit
Once you have modified existing files or added new files to the project, you can add them to your local repository, which we can do using the git add command.
$ git add .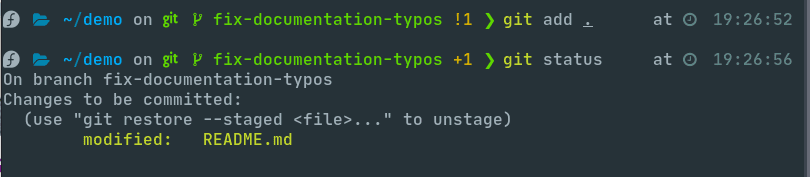
Next, we'll want to record the changes that we made to the repository using the git commit command with the -m flag and a short message in quotes.
$ git commit -m "A short description of the changes made."If you want to include a more detailed commit message, we will run the git commit command which opens the default text editor.
If you would like to configure your default text editor, you can do so using the git config command.
Nano:
$ git config --global core.editor "nano"Or Vim:
$ git config --global core.editor "vim"Depending on the default text editor you're using, running the git commit command should display a document ready for you to edit.
$ git commit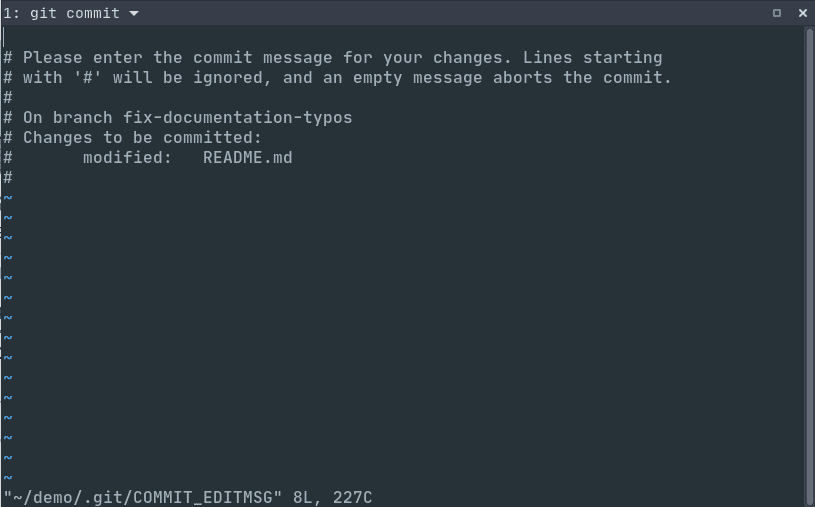
Once you have saved and exited the commit message text file, you can verify what git will be committing with the following command:
$ git status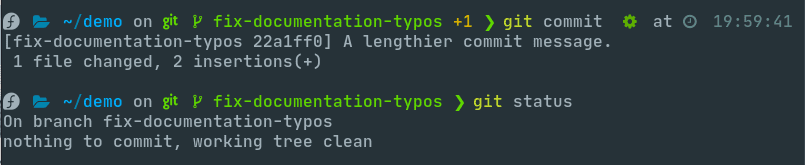
Pushing the changes to GitHub
We first need to identify the remote's name.
$ git remote {:.img}
At this point you can use the git push command to push the changes to the current branch of your forked repository:
$ git push origin [BRANCH NAME]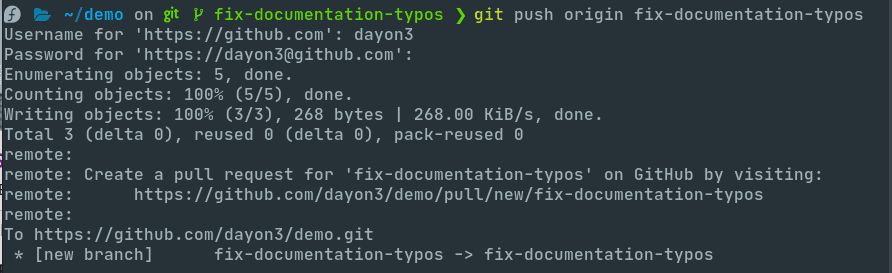
You can now navigate to the forked repository on your GitHub account and toggle to the branch you just pushed to see the changes you have made in-browser.

At this point, it is possible to make a pull request to the original repository, but if you have not already done so, you’ll want to make sure that your local repository is up-to-date with the upstream repository.
Updating the Local Repository
It is important to keep your local repository up-to-date with the project to avoid a pull request that will cause conflicts. You need to sync changes to keep your local copy of the code base updated.
Configure a Remote for the Fork
Remote repositories make it possible for you to collaborate with other developers on a Git project. Each remote repository is a version of the project that is hosted on the Internet. Each remote repository should be accessible to you as either read-only or read-write, depending on your user privileges.
In order to be able to sync changes you make a fork from the original repository you want to contribute to, you need to configure a remote that references the upstream repository. You should set up the remote to the upstream repository only once.
Let's first check which remote servers you have configured. Running the git remote command will list whatever remote repository you have already specified, so if you cloned your repository as we did above, you’ll at least see the origin repository, which is the default name given by Git for the cloned directory.
From the directory of the repository in our terminal window, let’s use the git remote command along with the -v flag to display the URLs that Git has stored along with the relevant remote shortnames (as in “origin”):
$ git remote -vSince we cloned a repository, our output should look similar to this:
Output
origin  https://github.com/your-username/demo.git (fetch)
origin  https://github.com/your-username/demo.git (push)
Next, we’ll specify a new remote upstream repository for us to sync with the fork. This will be the original repository that we forked from. We’ll do this with the git remote add command.
$ git remote add upstream https://github.com/original-owner-username/original-repository.gitWe can verify that our remote pointer to the upstream repository was properly added by using the git remote -v command again from the repository directory:
Output
origin  https://github.com/your-username/forked-repository.git (fetch)
origin  https://github.com/your-username/forked-repository.git (push)
upstream    https://github.com/original-owner-username/original-repository.git (fetch)
upstream    https://github.com/original-owner-username/original-repository.git (push)
Now you can refer to upstream on the command line instead of writing the entire URL, and you are ready to sync your fork with the original repository.
Sync the Fork
To sync our fork, from the directory of our local repository in a terminal window, we’ll use the git fetch command to fetch the branches along with their respective commits from the upstream repository. Since we used the shortname “upstream” to refer to the upstream repository, we’ll pass that to the command:
$ git fetch upstreamNow, commits to the master branch will be stored in a local branch called upstream/master.
Let’s switch to the local master branch of our repository:
$ git checkout masterWe’ll now merge any changes that were made in the original repository’s master branch, that we will access through our local upstream/master branch, with our local master branch:
$ git merge upstream/masterThe output here will vary, but it will begin with Updating if changes have been made, or Already up-to-date. if no changes have been made since you forked the repository.
Your fork’s master branch is now in sync with the upstream repository, and any local changes you made were not lost.
Create Pull Request
At this point, you are ready to make a pull request to the original repository.
You should navigate to your forked repository, and press the “New pull request” button on your left-hand side of the page.

You can modify the branch on the next screen.
GitHub will alert you that you are able to merge the two branches because there is no competing code. You should add in a title, a comment, and then press the “Create pull request” button.
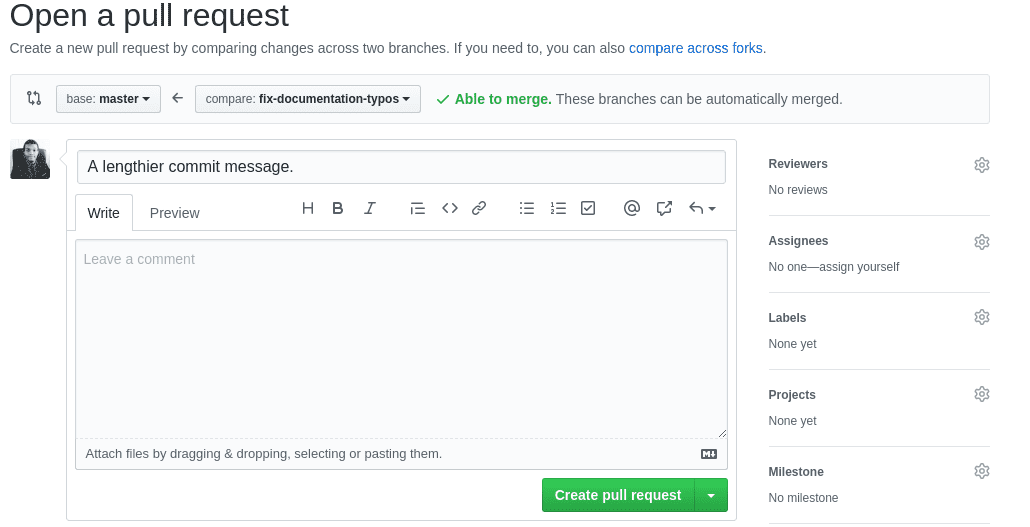
At this point, the maintainers of the original repository will decide whether or not to accept your pull request. They may ask for you to edit or revise your code prior to accepting the pull request.
Conclusion
Congratulations, you have successfully sent a pull request to an open-source software repository.
You should now have all of the tools you need to start integrating pull requests into your existing workflow.
If you’re interested in learning more about Git and collaborating on open source, you can read DigitalOcean's tutorial series entitled An Introduction to Open Source.